Installation and maintenance
CompostEra toilets are easy to install. You can install your system yourself with some basic DIY skills or with the help of a builder.
What you receive in your CompostEra package
- The CompostEra tank comes with a prepared compost bed, a built-in inspection hatch, a hole for the toilet chute, hole for the ventilation and a tap for the compost liquid to drain from.
- The base and top of the CompostEra toilet with a toilet lid and seat already fitted.
- The toilet chute and insulation foam to fix the toilet chute and base in place.
- Compost liquid barrel.
- Fan and ventilation piping.
You can install CompostEra toilets yourself, or with the help of a builder, but your system needs a little planning to ensure there is space for everything. Here is a planning checklist and an installation guide to help you.
Planning checklist
Plan where you want to position your CompostEra toilet
You will need to make a 28 cm diameter round hole in the floor for the toilet chute and should consider that the CompostEra toilet also needs enough space around it. We recommend the 28 cm diameter hole should be approximately 20 cm (at least 16 cm) from the back wall with enough space from either side walls.
One tip is to check where the beams are located in the floor. If you need to make the 28 cm diameter hole in the floor where there is a load-bearing beam, you may need to change the structure of your floor. Another tip is to not have a light directly above the toilet to make sure nothing is visible in the composting tank.
One tip is to check where the beams are located in the floor. If you need to make the 28 cm diameter hole in the floor where there is a load-bearing beam, you may need to change the structure of your floor. Another tip is to not have a light directly above the toilet to make sure nothing is visible in the composting tank.
Make sure you have enough height directly below the toilet for the tank
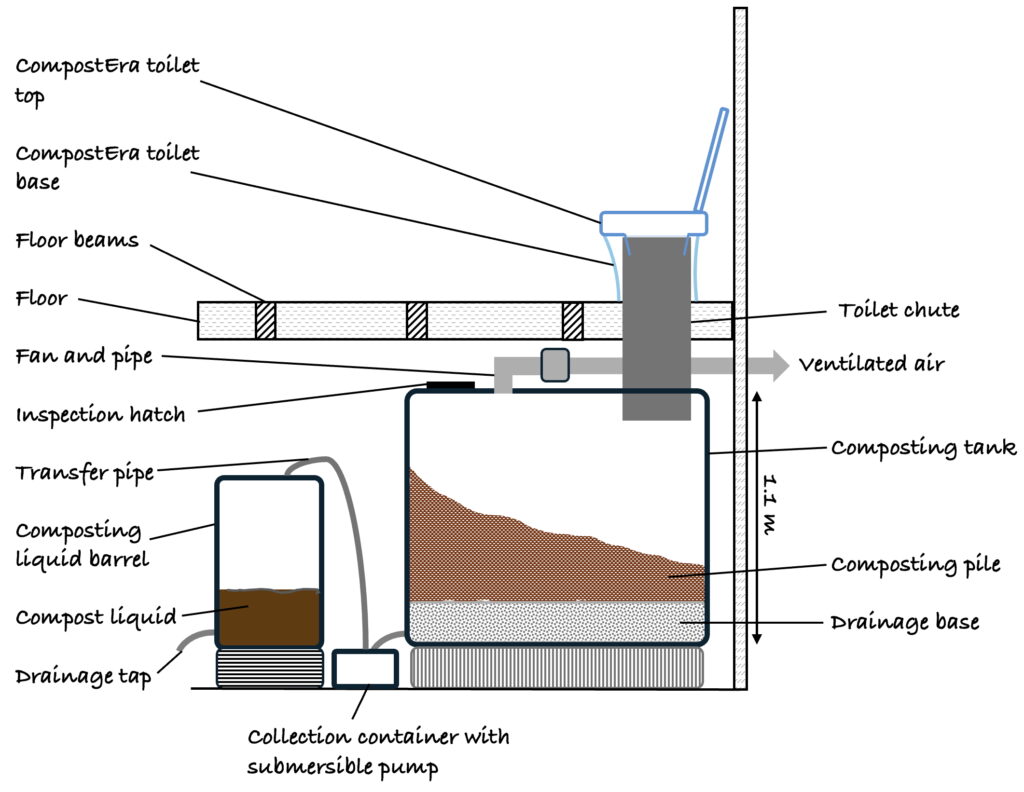
The compost tank must be positioned directly under the toilet and the toilet chute. Our small (1,150 litre compost tank) is 1.2 m high and our large tank (1,500 litre compost tank) is 1.4 m high.
Ideally, you would have the ceiling height to be able to raise your compost tank up on pallets. This will enable you to position the compost liquid barrel below the composting tank to allow the liquid to drain naturally.
CompostEra toilet design with a normal height basement:

If you have a limited ceiling height, you can use a submersible pump in a small container to automatically pump the compost liquid to the storage barrel. Note that a submersible pump and container are not included in the standard CompostEra package.
CompostEra toilet design with a low basement:
Still don’t have enough basement space or perhaps have a basement at all? Don’t worry – there are solutions, such as raising the toilet up on platform and/or excavating under the toilet. A small extension on the side of your bathroom can even be created to accommodate the toilet and tank.
Contact us to find a solution for you.
Ideally, you would have the ceiling height to be able to raise your compost tank up on pallets. This will enable you to position the compost liquid barrel below the composting tank to allow the liquid to drain naturally.
CompostEra toilet design with a normal height basement:
If you have a limited ceiling height, you can use a submersible pump in a small container to automatically pump the compost liquid to the storage barrel. Note that a submersible pump and container are not included in the standard CompostEra package.
CompostEra toilet design with a low basement:
Still don’t have enough basement space or perhaps have a basement at all? Don’t worry – there are solutions, such as raising the toilet up on platform and/or excavating under the toilet. A small extension on the side of your bathroom can even be created to accommodate the toilet and tank.
Contact us to find a solution for you.
Calculate how long your toilet chute needs to be
The toilet chute needs to extend vertically 20 cm from the bathroom floor. The CompostEra toilet will fit on top of the pipe, completely covering it. Note that the pipe should be 20 cm above any flooring you later add to the bathroom floor.
The chute also needs to extend down to the compost tank and approximately 5 cm into the tank.
20 cm + thickness of the floor + distance from ceiling to the compost tank + 5 cm (see the illustration below).
Tip: If you are in doubt exactly how long your chute needs to be, we recommend you order a slightly longer pipe and cut it once you receive your package.
Plan how to position the ventilation pipe and fan
The 110 mm diameter ventilation pipe will lead ventilated air from the compost tank to the outside of the property. It could lead out of a chimney, through the roof or the wall. We recommend the ventilated air be released high up to avoid unpleasant smells at ground level. A carbon filter or carbon filter foam can be added into the ventilation pipe to reduce odours if necessary (ask us for more details).
Installation guide
Once you have considered the Planning checklist above and your CompostEra package has been delivered, you are ready to follow our Installation guide:
Make the hole in the floor
Make the 28 cm diameter hole in the floor for the toilet pipe. We recommend exactly measuring the hole so that the chute fits snugly in the hole to hold it in place.
Position compost tank and chute
Raise the compost tank on wooden pallets directly under the pipe. Lower the chute through the hole in the bathroom floor and into the pre-cut hole in the compost tank.
Adjust the chute
Make sure the toilet chute is 20 cm above the floor in the bathroom and 5 cm into the compost tank. Cut the length of the toilet chute if necessary.
Install your CompostEra toilet base
Once the chute is in the correct position, put the toilet base of the CompostEra toilet on top of the chute. The toilet should sit on the bathroom floor with the toilet chute in the middle of it.
Fix the CompostEra toilet base
When you are happy with the position of your toilet base and chute, fix the base and chute into position by squirting the insulation foam into the bottom of the toilet base around the chute. Note that the foam will expand and harden to firmly hold the chute and toilet base in place. Once the foam has hardened, you can place the CompostEra toilet top onto the base (and fit the toilet seat and lid if not done already).
Now for the ventilation pipe
The ventilation pipe and location of the fan depends on your particular project. Insert the 90° ventilation pipe with the insect net into the pre-cut hole in the compost tank and connect your fan. You can then add the required ventilation pipe. We recommend adding a ventilation grill with insect net where the ventilation pipe emerges from the side of the building or roof.
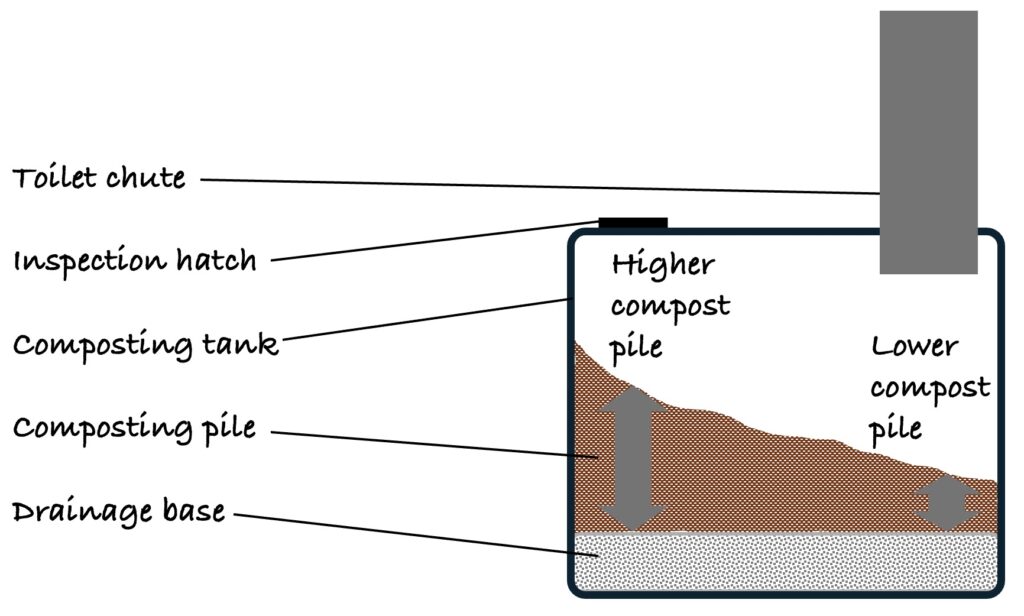
Rake your compost pile
Open the inspection hatch in your compost tank and rake the compost pile towards you. This will make the pile higher towards the tank where the inspection hatch is and lower where the chute is. It is useful to leave a short-handled rake in the tank within reach of the inspection hatch as you may need to level the pile in the future.
Connect the compost liquid barrel to the compost tank
Ideally, the compost liquid barrel is positioned so that it is lower than the compost tank. If this is the case, simply attach the pipe to the compost tank and fit the pipe into the hole in the compost liquid barrel. If not, you can either excavate a hole in the ground to accommodate the compost liquid barrel below the floor, or you can use a small container and a submergible pump to automatically transfer the liquid to the compost liquid barrel.
Start using your CompostEra toilet!
You can either add composting worms to your compost tank or a little compost activator every year. We recommend also adding some live topsoil from your garden into your toilet during this start-up phase.
Easy maintenance
Everyday toilet cleaning
A CompostEra toilet can be cleaned just as a regular toilet although there is no toilet bowl to clean or use chemicals in. Instead, the black inner plastic liner of the toilet can be cleaned with water/mild cleaner with natural ingredients and a scrubbing sponge.
As air is removed from the bathroom through the CompostEra toilet, it smells less than a regular toilet and requires no scented toilet products.
The top part of the CompostEra toilet, which includes the inner liner, is durable but can be replaced every 5-10 years to renew your system. The top part can be easily replaced by lifting it off the base of the toilet and does not affect the rest of your CompostEra toilet system. Contact us to order your new CompostEra toilet top.
Draining the compost liquid
CompostEra toilets produce a compost liquid that is almost completely free from harmful bacteria. The liquid is collected in a storage barrel as it drains from the compost tank. The barrel has a tap that can be used to transfer the liquid to a watering can or other container before it is used to water trees, bushes or a lawn.
As much of the moisture in the compost tank evaporates, a year-round CompostEra toilet only produces around 50 litres of compost liquid per person each year.
How often the compost liquid needs to be drained depends on how much a toilet is used and the size of the compost liquid barrel. The liquid is chemically stable and can be drained into smaller containers and stored for later use.
We recommend using the compost liquid to water trees, bushes and lawns between early spring and midsummer in northern Europe to ensure as much of the nutrients are taken up by plants as possible. Additionally, the liquid should not be used near watercourses due to the risk of eutrophication and/or nutrient leakage into nearby lakes and rivers.
Levelling out the compost pile
Over time, solid material can pile up directly under the chute and should be levelled out to optimise ventilation and the composting process in the tank. Levelling out the compost pile takes a couple of minutes and can be done through the built-in compost tank hatch. It can be useful to leave a short-handled rake in the tank for levelling out the pile when needed.
How frequently the compost pile needs levelling depends on how often the toilet is used, if it is used year-round or seasonally, and if the compost tank freezes during the winter.
A high-use year-round toilet may need levelling once every six months. Whereas a low-use or seasonal toilet may need levelling out less frequently.